One of the things I decided a few years ago when times were really tough was that never again would I work for clients that I didn’t like. When one is making furniture to commission, one is invariable working for somebody in particular and unless that person is in tune with you and your particular way of working, you are not going to give them of your best. The converse of this is that working for people that inspire you with their trust and confidence is indeed an uplifting and a privileged position.
 One such client who came to our recent London exhibition, buzzed around the show and took me off to lunch and then said ‘That was a wonderful desk you made I’d love you to make me one just like it but I have got to wait until I move house. In the meantime would you just make me a hat stand.’
‘Er, yes of course Maggie’. I should point out that over the past few years I have made several pieces of furniture for Maggie and got to know her quite well. It’s a mark of the confidence I had in our relationship that whilst we were talking, I did something I very rarely do, which was doodle an idea down literally on the back of a paper napkin and it’s that idea that very much forms the basis for the rather exotic piece of furniture that we were to make for her.
‘That was a wonderful desk you made I’d love you to make me one just like it but I have got to wait until I move house. In the meantime would you just make me a hat stand.’
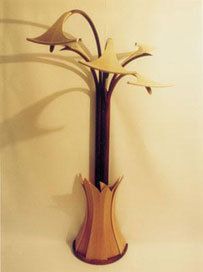
My idea was that this hat stand would be very organic. The dark red stems would emerge from a pale pink pearwood base and rise 5 or 6 dark red laminated rosewood stems that would each finish off with a grand carved flower or leaf form. The leaf forms will provide the clothes hooks and the base would give the brolly stand. The whole piece would be wall hung. This was essential as the piece would essentially be top heavy, especially when laden with wet and heavy overcoats and this enabled us to overcome any problems of stability whilst enabling me to keep the piece light and sexy.
We began the job by picking out some especially good Rosewood. Nick Chandler, who made this piece for me, was very anxious that we got perfect laminations with no visible glue lines. We achieved this by first resawing the 2 in board into 2.5 mm laminations. Each laminate had one sawn side and one side from the planer. Nick was very careful to keep the laminations in sequence. We then took them off to a local workshop and bought time on a thicknessing sander. This is a wonderful machine that will sand components to a uniform thickness of incredible accuracy. It would be silly for a workshop like ours to have one of these machines. They are large, expensive and require a dust extraction system that draws so much power that it dims the lights in neighbouring buildings but it’s wonderful to know that it’s there should we need to buy time for using it.
Once the laminates were made we went for the big bend. I had decided that all five stems could be made from one former. This was a simple MDF shape that we bent the laminates around when the glue was still wet. We could have used two or three different shapes or even gone to the extreme of using five different moulds but I thought that there was going to be so much variation and so many new curves going on in this piece that it would lend the piece some structure to make each of the stems using the same mould and create a little visual tension by working against this similarity of shape. It’s almost as if one was given the freedom to use any shape in the world and one chooses the discipline of not doing this but working within a restricted visual language. There is also here a matter of economy. I have chosen to use Rosewood because I wanted these stems to be thin and spare but at the same time knew that they would have to be relatively stiff to support the weight of soggy, wet clothing. Rosewood is one of those timbers that has immense tensile strength and enables one to work these thin shapes without to much spring back.
Nick and I had worried about the laminating because it was Rosewood. Would the laminates be too stiff; could we get the glue line to hold; could we get the invisible glue line. We fussed and worried like a pair of silly old women because I suppose that’s what cabinet makers do when they want something to be just so. We worried about what glue we should use. Should we try an epoxy system like the West System. We didn’t want to use Cascomite because it was really too brittle, so eventually we came back to good old PVA and used Evostick Waterproof PVA, which I must say has given us an exceptionally good result. We were able to apply the glue over all 8 laminations giving an even coat to both surfaces, using a small lambswool roller that spread the glue fast and very evenly. These are not specialist equipment but an adaptation of a small roller used for painting the backs of radiators and available from any good DIY shed. We use these any time we have to put on a lot of glue evenly over a wide area very very quickly. Once the glue was on it was a matter of quickly putting it on the mould and banging on the cramps as fast as we could. Here we used a clamping system that starts at one end and bends the job around the curve. Final tension down on to the mould is achieved by wedging each individual cramp with a small wedge and hammering it home. Did Nick achieve perfect glue lines – you bet he did.
 Next came the base which is a jolly tricky bit of cabinetmaking. The challenge we had was that I wanted a structure that was visually thin and light but took the hat stand from the floor and gave it an uplifting swing. Its practical purpose was also to be a receptacle for umbrellas and walking sticks. Always think very carefully about how a piece of furniture comes down to the ground. I was pressed here by Nick quizzing me and prodding me into simplifying my earlier rather fussy mouldings around the base of the piece. We developed the piece really by ‘suck it and see’ technique. This is where the relationship between designer and maker is important as their requirements are different. The designer wants to keep it all open for as long as possible putting of decisions until he can see everything working together. Whereas the maker needs a few decisions to be made so that he can get on plan the next few days and just do it. Fortunately Nick and I get on very well , he nags and fusses and eventually I make my mind up. Our first step was to find a constructional method, which turned out to be making the five petals from laminations using constructional veneers 1. 5 mm thick. To test this out we first made a mock up using 3 laminations of hardboard. This was cheap and quick and enabled us to find out that our first mould had far too shallow a curve and the curve needed quickening up and heightening to create a nipped-in waist to the piece. When the second set of hardboard leaves were shaped and hot glued together to enable me to see the thing really for the first time, we began to make some progress. At this stage one has an image at the back of ones mind that is driving the whole project in a certain direction. The job of the prototype or mock-up is to realise that image and help solve some of the visual and constructional problems. Each leaf was veneered up onto a preformed mould and put inside Nicks wonderful heavy duty vacuum press; the inside of which would correspond very well to Europe’s description of his dark and gloomy place. For unlike modern vacuum bags this is a dark, heavy vulcanised rubber vacuum bag that would be a fetishists delight should one be that way inclined. the use of a vacuum press has very much liberated my way of working with laminated curved shapes and I look forward to faffing about in the dark and gloomy place again in the future.
 Whilst at the same time as developing the base I also tried to push the design of the “flowers” along. I say “flowers” but that’s only really to differentiate them from the other components. I did want them to be very blonde and extremely organic. By chance we had a pile of ripple sycamore off-cuts in the workshop that were the by-products of another job that we are working on at the same time. So it was natural to make these pieces in ripple sycamore. I don’t often use more than two different timbers in a piece of furniture but in this I think I have done so and got away with it. The shapes of the flowers evolved by my hot gluing cardboard shapes onto the Rosewood arms and using these shapes as rough templates for drawing onto the Sycamore blanks. Again each flower was developed very much as a collaboration between Nick Chandler and myself. It felt like we were uncovering the shape within the timber and could only do so by removing one or two facets at a time. Each of the flower shapes were quite deliberately made slightly different. This gave the piece variety whilst at the same time it was important that there was a strong family resemblance as I wanted to keep the overall simplicity and wholeness of the piece very clear. As a designer this is a dangerous process of developing the variety and visual interest within the piece whilst retaining the overall integrity the overall simplicity . This is the paradox of complex simplicity .The more one searches for simple clean forms the more one understands that it does not work out like that . Those universal simple forms are so dull so predictable probably because they have been used so often, you have to find another way of taking the obvious and turning it on its head.
Its as if simple forms have to be arrived at from a process of resolving complexity, a process of refining, resolving, and simplifying. In this way simple forms have an underlying complexity and interest.