 Last month I talked about how veneers have come to be used in furniture making, how this is not a cheap and shoddy technique but a technique with the potential of using the most beautiful woods available in an efficient and technically sound way. We looked at the preparation of the ground and the application of lippings. This month we will be preparing the veneers, jointing them together into a lay-up and gluing that lay-up on to the ground.
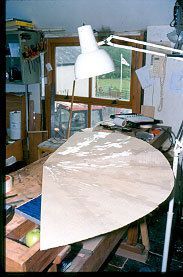
Handling veneers requires a certain degree of care and discipline. Veneers are quite fragile pieces of material and can easily degrade if left out in a hot dusty workshop. Keep your veneers under a thin cloth, keep the dust off them and if they going to be handled a lot put a strip of tape across the end grain to keep them from splitting. It’s a good idea as well to keep your leaves in sequence as they come off the bundle. A veneering workshop is usually a pretty clean, tidy, well ordered place, so sweep the shop up and get rid of all the rubbish before you start this process. You can, if the job you are veneering is relatively large, find yourself handling quite large leaves of veneer and need at least a sizable area to lay them out on. We’re lucky in that we have a secondary bench room which we use for veneering which is clean, clear and kept dry and relatively warm.
The technique and the tools you need for this work is a good sharp bench knife for trimming your veneers, a bench plane and a long shooting board.
It would be pretty unusual to apply just one leaf of veneer to a surface. Usually leaves have got to be joined to one another. Last month I had worked out the decorative pattern of the leaves on my sunburst dining table so taping these leaves up was my next job. I have used lots of different tapes in my time for this purpose, some of them with greater success than others. The favourite at the moment is a clear and wide parcel tape that we get from our local stationery suppliers. It’s a relatively low tack tape, which is important because you have to, when the job is glued down, pull the tape off the veneer before sanding, and if there is too much glue on the tape then it sticks too well to the wood yet there has to be enough glue to hold the two leaves together, so a low tack sellotape is ideal and this cheap parcel tape seems to fulfil that role really well. Being about 1 1/2 inches wide is also important. In putting the tape on you need to quite frequently pull the two leaves together and with a wide tape you can pull the straps joining the wood over a reasonably wide area with one pull. Clear tape is important because you want to see the joint underneath your tape to check that it is right up.
The technique and the tools you need for this work is a good sharp bench knife for trimming your veneers, a bench plane and a long shooting board.
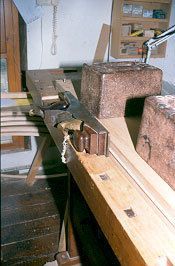
Before the leaves can be joined together with the tape the edges have got to be shot straight. This is done with a bench plane ideally quite a long plane. A fore plane or a jointer would be ideal. My own bench plane is about 14 inches in length and it seems to do a pretty good job. Stack your veneers up as it’s possible to shoot quite a big stack of veneers at one time. I think I was shooting nine leaves at a time which isn’t by any means the maximum. After these are stacked up put them on a relatively straight edged board and cover them with a second board. Try a weight to hold the pack down I use two 56 lb sack weights which seems to hold everything in place. When you are shooting the edges just be careful that you’re trimming the whole pack of veneers and no leaves have crept back out of sight. You can see this with a slight irregularity on the surface you’re planing. Aim to run the plane with a single stroke taking consistent shavings off the entire length of the pack of veneers. In this way you’ll get a smooth straight edge which can be pulled up to its neighbour and make a perfect joint without glue lines.
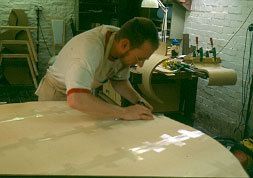
 Having shot the edges it’s time to use the tape. The technique is to apply straps across the two leaves that you are trying to pull together. I place my straps 4-6 inches apart but they can be closer if the veneers aren’t pulling up as they should do. Lay the veneers with the proposed joint running down the length of your bench. Put the two veneers side by side and take a 6 inch length of the clear adhesive tape. Stick one end of the tape on the veneer furthest away from you and pull the strap and the attached veneer towards you whilst holding the second veneer firmly down to the bench. The joint between the two veneers should pull up tight and close. Now press the tape down onto the second veneer holding the two veneers permanently in place. Repeat this procedure all along the joint at 4 to 6 inch intervals. Bring the straps together if necessary. Then pick the two veneers up and hold them up to the light. If the veneers have been shot properly and if you strap the two veneers up together properly you shouldn’t see any light glimmering between the two veneers. If that’s the case run a strip of veneer down the seam of the joint and proceed on to the next one. You are now a skilled veneer cutter.
When you are shooting the edges just be careful that you’re trimming the whole pack of veneers and no leaves have crept back out of sight.
My challenge with the job I had was bringing 16 leaves together around a central point. This is the very devil of a job as it is impossible to get tape on the very end of the veneers and so you get at least half the leaves jointed up and by that time they are all wiggling around and flicking underneath one another. Get one point a micro tad out of place and the entire sunburst is ruined. Which is why my clients are expecting me to put a marquetry panel in the centre of this table with their initials in it. I may yet surprise them and myself and get a successful sunburst that doesn’t need a marquetry panel to cover it up.
When you are ready with your finished lay-up it’s time to glue it down to the ground which you prepared last month. With a small veneered panel you can do this with a sheet of MDF and a few cramps but with anything larger than 12 x 18 inches I would be tempted to look for a press. Most veneer workshops have what are called daylight presses and platens large enough to take a full 8 x 4 sheet and one would want to use a press if one was pressing Burrs or anything at all bumpy or recalcitrent.
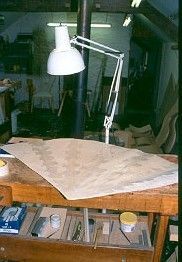
I’m now talking about flattening these veneers. In the job I have been working on and I have been handling relatively well mannered material. Sycamore even Ripple Sycamore is not too stiff and bumpy and can be pressed down on to the ground without too much difficulty but if you have Burrs, like Burr Walnut that have dried into a surface that makes corrugated cardboard look smooth then you have to do some flattening. This involves damping the veneer, getting it nice and flat then drying it off before you press it between sheets of dry newsprint. It’s important to dry the veneers off because even with damping them they will have swelled and expanded and the heated daylight press will shrink them down pulling them away from the seamless taped up joints. When you are working with an especially flattened burr its important to keep them stored under cover. If you leave a flattening veneer out on the bench top for too long it will fairly quickly return back to its dry and corrugated state. I use a piece of glass to keep over the veneers I’m working on and a piece of hardboard with a weight on it to pull over my running stock.
I was warned that with some veneers and Sycamore was one of the some, the glue has a tendency to seep through the surface and show up in the polishing.
 Glue was an issue with this job. When you put glue on veneer, generally it expands because there is some water in the glue. Some veneerers use PVA though most small workshops would stick to a glue like Cascamite. Specialist workshops that do a lot of veneering can use a glue like RL39 which is only available in larger drums and has a 3 months shelf life and is uneconomical for small workshops. So the choices open to ourselves are PVA, which has a relatively short open time and a reputation for causing bubbles, Cascamite which has 10 – 15 minutes open time and a reputation for being brittle or a West system epoxy. I had no option with this job but to use West system epoxy as it’s the only glue available without a moisture content. So in this case my sunburst could be laid at one go without expanding. This was the first time I had used West system and I must say that although it’s expensive it’s a very good glue. I was warned that I needed to buy the two plungers that fit on the top of the two bottles for like all epoxy’s this is a two-part system the glue itself and a hardener. The pumps enable you to mix the glue in the correct proportions. Three pumps of glue to one pump of hardener giving you the exact 3 to 1 proportions that would be otherwise difficult to control. It’s also possible in this way to mix up a relatively small batch of glue for a small gluing job and making this system relatively cost effective. Used in its natural state West system is a clear liquid that’s quite thin and runny. I was warned that with some veneers and Sycamore was one of the some, the glue has a tendency to seep through the surface and show up in the polishing. The way to avoid that was to apply a thickening agent called colloydal silica. This is very funny stuff having massive volume and almost no weight. You spoon in into the pre-mix glue in batches. Be careful about this, we had one batch go wrong and not stick and it was down to the fact that we put the silica in to the glue before we had stirred it up. (Apparently the hardener is a lighter liquid than the glue itself and will sit on top of the unmixed glue, if you then as I did, put the silica powder into the glue before stirring it, the silica will absorb more hardener than glue because it is also sat on top of the mixture and it will affect the performance of the glue.) So stir your glue before mixing in the silica. We were putting in about 2 tbls of silica for every 3 pumps of glue to get a nice, stiff mixture that could be put on the ground with a notched glue spreader. This we have worked out on tests gave us the right amount of glue at that consistency to hold the job down without bleeding through the delicate veneered surface. Technical aint it!
 One of the wonderful benefits of West system is the open time. We had almost all morning to play around with this glue. Well – not quite that long, but certainly we could take our time, spread the glue out, carefully position a layout on the ground, and then slowly and carefully slide it into the bag. Yeh we were using a vacuum bag for this job. They don’t exert as much pressure as a daylight press so they are not so good at putting down bumpy veneers but I figured it would be ok for this job. I have a heavy rubber vacuum bag that I use for 90% of all my veneering, known in the workshop as “Eyore’s dark and gloomy place”. This bag is a rubber fetishers delight, with that strange and rubbery smell and wrapping round you as you climb inside it as you place the job at the far end of the bag adjacent to the vacuum hose. This is not my particular fetish, I don’t really enjoy climbing inside the vacuum bag and was glad on this occasion to borrow Graham Scott’s much larger transparent vacuum bag. When you are using a vacuum bag you have to have a flat baseboard on which to veneer otherwise the bag can distort your job and it’s a good idea to cover the job with a thin sheet of hardboard or 3 mm MDF that extends over your job by no more than 5 mm. This stops the bag pulling the veneers over the edge and damaging your job.
That job done, and yes so far it looks like we do have a sun burst that meets at a pinpoint all that remains for me now is to veneer the leaves of the table, put in the cross-banding and an in-lay. That I’ll talk about next month.