 Mr Veneering is I believe a Dickensian, or was it Goldsworthy, character who was named in such a manner as to indicate a rather thin personality, someone lacking in integrity and solidity. We have this view of veneering being somehow shoddy and insubstantial and if truth were told some of the cheapest furniture around is indeed veneered. Not however with wood but what is called in the trade, foil backed laminate, a rather disingenuous description of paper printed with a photographic reproduction of wood and stuck on an MDF core before the whole sorry mess is dipped in plastic. “Not at all like solid wood sir but that’s been priced in band 7 whereas what we’re talking about is priced in band 3. Yes you guessed it Ive had a kitchen planner coming to help us sort out our 15 year old kitchen, what fun!
It is a view that many people have of veneering however it is an ill informed view for veneering was a technique derived to enable one to take an extremely rare and expensive piece of highly figured wood and open it out and use it with greatest economy and effectiveness. Some of the finest furniture in the world ever made have been veneered. Traditional veneering techniques are in many ways more expensive than solid wood for far more processes are involved to create a panel, lipped and veneered both sides than would be required to produce a jointed planed and dimensioned panel of solid wood. One of the greatest benefits of veneering apart from the decorative potential of using extremely highly figured wood is the technical benefit of avoiding with one deft movement all of those technical nightmares associated with the movement of solid wood, for the generally held view is that veneered panels don’t move. In fact they do, and you can get seriously caught out with wood movement on veneered panels but I’ll talk about that a bit more later on.
Veneers are cut usually after a process of steaming and soaking, to make it hot and pliable.
Most veneers are knife cut to a thickness of .4 of a mm. You can buy thicker veneers called constructional veneers of 1, 1.5, 2 mm thickness. These are often used for lipping or for laminated work but general veneering is done with knife cut .4 mm thick veneer. Now if I couldn’t be a furniture maker and I wanted to make some serious money in my next life I would consider owing a veneer cutting machine. When I look at the price of good quality logs standing at something like £30 a cubic foot for an air dried timber I can find myself paying something like £8 or £10 per sq. metre of .4 mm veneer. That’s per square metre not per cubic metre you can see that there’s some serious added value going on somewhere. Veneers are cut usually after a process of steaming and soaking, to make it hot and pliable. The log is held rigidly firm in a heavy cast iron bed and either a heavy gauge knife is drawn over the log or the log passed underneath the heavy knife blade. Once one leaf is peeled off the log this knife is lowered by exactly .4 of a mm to the log and the whole process is repeated. No wood is wasted except a bit on the top or a bit on the bottom. Although this veneer knife is a serious piece of kit look at what added value is created, (for added value read potential profit). When a veneer is cut it is stacked in consecutive leaves in bundles or half bundles of 16 or 32 leaves. If you buy veneers try to buy them by the bundle or half bundle. If you buy a few leaves you’ll spend a lot more money though on the other hand if you do go the cheaper route you’ll always have those few leaves left over that inevitably sit around the workshop gathering dust, discolouring with light and generally getting pretty tatty. So a good veneer store like Chrispins of East London will keep the veneers cool and slightly damp. They’ll cover them with cloths and keep the light off them. A veneer store is a wonderful place. I have the kind of fun in a veneer store that my wife has in a fabric shop. Here you can see really clearly the surfaces that will be assembled and polished up into your pieces of furniture. It’s not like looking at the sawn and dusty surfaces of solid wood boards and trying to peer through the grime and confusion to see what’s going on, here it’s all out in the open. A veneered surface will only need a careful sanding before it’s polished so what you see is what you get. And what do you get, some of the most beautiful figuring imaginable, sandalwood, burr oak, king wood, Rio rosewood, birds eye maple. Some of these are only available in veneer form such as myrtle burr, coramandle, and thya these are some of the most extraordinary and exotic surfaces known to man. The very idea of thinking of them in the same context as Mr Veneering is absurd.
So you’ve chosen your veneers, you’ve got a bundle or half a bundle home, what are you going to use for solid. What! –thought we were talking veneers. Well the surfaces of your boards will be of a good veneer and your edges will need something to make them look halfway decent. The usual practice is to lip the edge of your ground and I’ll come to ground in a minute, the edge of your ground with a solid wood lipping. This would allow you to detail your edge, provide somewhere to take knocks and bumps. It’s bad practice to put too wide a lipping under a veneer as the movement of the lipping in relation to the ground and the surface veneer can telegraph through, which means that the solid wood lipping acts like solid wood and the ground veneer stays inert and the difference between the two becomes visible. This can be overcome as I’ve had to very recently in a job I’ll talk about very shortly, called counter-veneering. That is putting a second layer of veneer under your top layer. I did this recently because I had no alternative but to put a 20 mm lipping underneath my veneers, fearing that that would telegraph through I did two things.
A veneered surface will only need a careful sanding before it’s polished so what you see is what you get.
I detailed the area where the telegraph through may come with an ebony line and I counter-veneered the ripple sycamore surface with plain sycamore counter-veneer. This also helps me as the ripple sycamore is a notoriously transparent veneer especially when sanded and polished and the slight difference in colour between the MDF brown and the sycamore or maple lipping has been known to be visible through a ripple sycamore top of veneer. It is possible to use veneer for your lipping but the problem is it leaves a very vulnerable corner, so you don’t see it very often in top quality work. What you can do in this situation however is to put a solid wood string line down that corner. Strings and things are all a sort of veneering and I’ll talk about that later. My word there’s a lot that’s come up later. Bring your lipping and ground material into a warm dry part of your workshop. This is because contrary to the general though board material does move around – it can swell and expand in a damp machine shop. We have a room that is conditioned by running a night storage heater and a dehumidifier to help keep the moisture level down. It doesn’t help when people keep opening windows because it’s hot and stuffy in there but one can only do ones best to keep the wood dry and comfy. Leave the ground material and your lipping material in there for at least a week before finally fitting your lipping and then your veneers. Treat it like solid wood – keep it in stick, keep the sunlight off it – this is especially important if your work is going under a lacquer finish or is going into something like a corporate situation where the air humidity may be very low. If this is the case you’ve got to fill your workshop with dehumidifiers and keep the windows shut, getting the ambient humidity down to something like 40%, especially prior to lacquering.
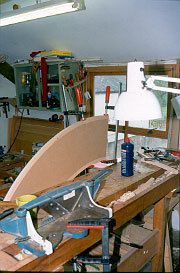
Fitting lip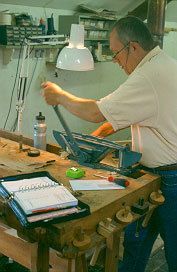 pings to MDF ground is virtually straight-forward. You can use sash cramps or edge cramps. My particular job was too awkward for either of these so I’ve put speed cramps about ½ inch out from where the lipping was and cramped up with a small hardwood wedge to bring out small bubbles of glue that indicates you’ve got a good joint. We are back to the “Sahara school of joinery” in this workshop since the departure of Nick Chandler. I support a school of thought that says that if you have two pretty good mating surfaces all you need is a little bit of glue and a little bit of pressure to bring them together. Nick was of the “Juicy-Lucy school of woodworking” with great dollops of glue squirting out to the four corners of the workshop. Lippings like this can just be jointed up to one another as you go around the job. I was doing a circular table and there’s the risk that I might not get them spot-on but I wasn’t unduly worried as you can always do the old cabinetmakers trick of running a dovetail saw down an imperfect joint and slipping in a piece of matching veneer. The trick is to hammer the piece of veneer quite hard against a suitable steel surface like an anvil or the top of a steel vice. This makes the veneer slightly less thick than the kerf of the dovetail saw and the veneer should slip into that really easily. Add a dab of PVA glue on both sides of the veneer and pop it home. The moisture on the PVA swells the veneer back to its normal .4 mm thickness, and the veneer fills the kerf of the dovetail saw eliminating any sloppy joinery. This repair is so tight and snug that it is almost invisible to the naked eye and would only be seen by cabinetmakers, especially those of a vindictive nature.
Having flushed off with my router and then go over for one clean shave with a finely set bench plane because I want my surface dead flat not the approximate flatness that one can achieve with the router set up. I was also concerned about my glue lines as I was working very blonde timber and a plane surface will always give me a finer glue line. Your ground surface is now prepared and ready for veneering.
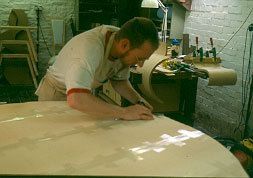
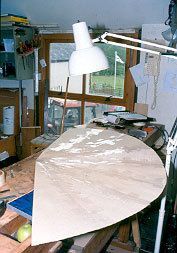
Try to keep your veneers in the order they were cut in the bundle. You can do this by marking or numbering them or putting cabinetmakers triangle on the end of the bundle. Don’t mark the edges of veneers however especially blonde woods as your pencil mark will sometimes show as a defect in your joint. Having marked your bundle you can begin playing with them and working out which bit of figuring you want to use and how you want to use it. As the figuring on your veneer will probably run through the entire bundle of veneers slightly altering as it moves from leaf to leaf, laying leaves from the same bundle can have a rather boring harmony. We are used to seeing sequential and book matched veneers so try to do something that looks unusual without destroying the harmony that one can get from sequential leaves. My table top was what is called sunburst where I had 16 leaves radiating out from a central point. I bought a part bundle of 9 leaves of ripple sycamore for this job. The radius of my table was about a metre so I chose 2 sections of veneer – one from one end and one from the other to give me the pieces I wanted. 18 leaves in all from the 9 leaf bundle. These sequential leaves were then alternated around this central sunburst point so the harmony is maintained but the eye was challenged and confused by a slightly unorthodox pattern.
 When you are selecting a veneer also bear in mind a veneer has a tight side and an open side. This is trade terminology designed to confuse you but its stems from the way the leaf has been separated from the log by the veneer knife as it was peeled off the log. One side of the veneer will have microcracks that will enable it to curl up and one side will not. The side with the microcracks is the open side and the side without is the tight side. If you flex your veneer across the grain one side will bend and flex easily – that is the open side the other side will be stiffer – that is the tight side. These two sides of the veneer have a property of reflecting light slightly differently. I use this in my job by again alternating tight with open hopefully to catch light and enhance my sunburst style.
Next month we’ll get round to taping these veneers up and sticking them down on the ground. You will see whether I manage to get all of those leaves up to a tight pinhead point or not. (Yeh, course I did!)