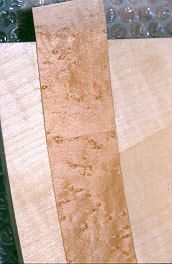
 This is the third in a series of articles about veneering but in this article I’m going to be concentrating on the finishing details – in this case decorative details called banding and inlaying. What’s the difference between these two processes? Basically an inlay takes the form of a line or string and its inlaid into the surface by first creating a groove. Formerly this might have been done with a scratch stock but now we more commonly use an electric router and a small “white lining” bit. Strings come in various sections but they are usually square. Lines that I was inlaying in this job were 1 ½ mm square and 3 mm square, strings of ebony. Strings are used in cabinet making to add an accent and highlights and this job is to provide a hardwearing edge on the outside corner of the table top. Banding on the other hand can be a flat surface no thicker than a veneer. You can buy banding in all kinds of shapes and sizes and commercial veneer suppliers will offer you a wide range of commercially made up bands consisting of king wood Holly, Rosewood, Birds Eye Maple, or whatever, made up into decorative bands that can enhance your furniture, or detract from your furniture, depending on how you do it. The other way is to make your bandings yourself which is what I did in this case. My client, bless her heart, wanted a contrasting banding to a Ripple Sycamore table top and I suggested Birds Eye Maple. This is another blonde timber like the sycamore but is slightly pinker and to give a subtle contrast on either side of this banding we decided to put in a thin black line 1.5 ml across. The banding was going to be made around the circumference of a 10 seater table so each section of banding had to be cut to a radius that lay parallel to the edge of the table. Then the banding had to be cut across grain from the leaves of Birds Eye Maple that I bought for this job. Quite a lot of banding is laid in across the grain. This helps to give the banding definition as it catches the light slightly differently to the long grain of the rest of the job and if your banding is relatively narrow it may give you the chance to bend it around a slight curve. I was unlucky and couldn’t bend mine as my banding was nearly 20 ml in width.
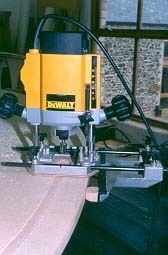 The process of going about this was to first route the opening that the banding would fit into. I decided that the easiest way was to first fit the banding then route an inlaid line on either side. This gave me an opportunity to put the banding in then decide whether I wanted those black lines or not. There was also the practically consideration that if I messed up my joints and showed a bad glue line around the banding the chance would be that I could route the black line in and hide my mistake. Regular readers of this column will note that I make lots of mistakes. Before I could do this I had to fit the leaves of my table to the centre. I should explain that this is an extending circular dining table with a 6-seater centre table and leaves fitting on around it to make a 10-seater dining table. This has got to be done first because my decorative elements, banding and the like were all routed off the outside perimeter of the table. To route this I used a small De Walt router that had been loaned to us on test. The router was set up with a side fence fitted with two small buttons that rubbed against the perimeter of the table and allowed me to route parallel with that curved surface. The little De Walt router did the job OK but by the end of it I was ready to throw it in the bin. I use small routers quite a lot and the one thing that they have got to do is plunge up and down sweetly. This little router when it arrived at the workshop was one of the sweetest of the bunch we tested, it plunged nicely and seemed to be a really well made tool. However, that was a few months ago and the router has now seen a deal more service in what is a fairly busy workshop. Now less than Six Months later the plunge action is graunchy, it will sometimes take a healthy tap on the head to get it to move at all and no amount of cleaning of the columns and spraying with WD40 will get it to become free and easy like it should be. I hate tools like this. What makes me even more cross is that before I wrote this article the editorial office contacted the Dewalt P R department and informed them that I was cross with them yet nobody has contacted me to arrange return of their router or to see what my complaint might be. Never mind, that’s the last bit of Black and Decker equipment – ophs didn’t I say De Walt, that’s the last piece of De Walt equipment that’s going to see service inside my workshop.
I thought about joining them all up, taping them up and then gluing them into the recess using a caul and cramps, but I thought that using hot glue might be more fun.
Once the recess was routed out the cross banding was cut using a workshop made trammel bar. A trammel bar is a tool used for cutting circles. It has a pivot at one end and a cutter at the other. In this case the pivot was a drill bit. You drill the hole through the bar and in to some form of a base plate, in this case a piece of MDF. Then turn the drill you used upside-down and use the shank to act as a pivot. The other end held two blades from two cutting gauges separated by wedges to scribe two lines exactly the right distance apart and I used this across my leaves of Birds Eye Maple. Each time moving a leaf in towards the pivot as each piece of the banding was cut off.
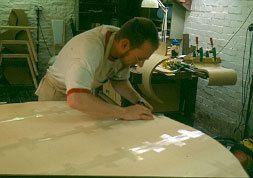
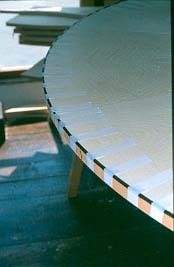
I now had a stack of banding each 20 ml wide by about 150 ml in length and these had to be fitted to the leaves of the table. I thought about joining them all up, taping them up and then gluing them into the recess using a caul and cramps, but I thought that using hot glue might be more fun. Indeed it was, I like hot glue and this is one of those cases where it was probably quicker to use hot glue than to faff around with cauls. The glue is heated up, in our case we use a thermostatically controlled electric glue pot. It makes a lot of difference. In the old days we had the glue in a double boiler which lived on the workshop stove and needed constantly refilling with water and dealing with overflowing glue pots. This amusing event was known as “melt down” and was accompanied with lots of steam, hissing gluepots and dashing cabinetmakers.
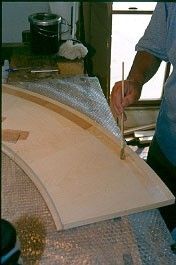
The glue is painted on to the ground and allowed to sit there for a minute or so while it chills off. Hot glue has no grab at all but chilled off glue will grab like Evostick. I than lay each piece of banding into the recess and hammer it down. I dab a bit of hot glue or hot water on the top of the veneer, the dry side to moisten it. If you just have glue on one side and dry veneer on the other, your banding will curl up rather than stick down. I then let it sit for a while before proceeding with cutting in to the next piece, as the veneer will slightly expand in width as it absorbs moisture. Joining to the next piece is achieved by overlapping one piece with another, taking a knife and cutting through both pieces at the same time and then hammering down. You can if you are feeling anxious about this put a little bit of paper tape, the kind of tape used for parcels or especially made veneers paper tape over the joint. Hide glue or hot glue or animal glue as it is called must be allowed to thoroughly dry off before you proceed with the sanding. In the drying process the glue will pull the veneer down into closer contact with the ground so it’s foolish to sand any veneer surface flush before the glue has thoroughly dried for at least 48 hours.
 Next comes the inlaying of the lines, you’ve got the banding in and we want to put the black lines on either side of it and around the outside edge of the table. Because I’m working with two extremes – hard black ebony lines and white soft sycamore, I had to adopt a very careful approach here. When sanded the dust from the ebony will very easily lodge in the open pored blonde surface of the sycamore giving a grey and dirty surface that is very difficult to remove. I dealt with this by first of all routing the recesses for the ebony lines on either side of my banding using my graunchy De Walt router and a 1.5 ml straight router bit. This is often in some catalogues called a while lining bit for obvious reasons. These bits can break for a pastime so if you are doing this job always carry a spare. Once the recesses were created I then went over the surface with a thin coat of shellac polish. This sealed the surface of the sycamore and filled the pores to a great extent. I knew I had to sand the surface again but the shellac will stop the ebony dirt lodging in those pores and prevent it from discolouring the surface. The lines were then glued in. You do this by applying the glue to the line and pressing it into the prepared recess. Make sure your recess isn’t too deep so that when pressed the ebony line still stands slightly proud of the surface and when dry the ebony line can be sanded to a touchable surface. To achieve this it can be scraped flush with the surface with a finely sharpened cabinet scraper. This is preferable to sanding as the scraper will remove the waste without leaving dust, leaving the final flattening to be done with a fine sandpaper.
 One of the wonderful benefits of West system is the open time. We had almost all morning to play around with this glue. Well – not quite that long, but certainly we could take our time, spread the glue out, carefully position a layout on the ground, and then slowly and carefully slide it into the bag. Yeh we were using a vacuum bag for this job. They don’t exert as much pressure as a daylight press so they are not so good at putting down bumpy veneers but I figured it would be ok for this job. I have a heavy rubber vacuum bag that I use for 90% of all my veneering, known in the workshop as “Eyore’s dark and gloomy place”. This bag is a rubber fetishers delight, with that strange and rubbery smell and wrapping round you as you climb inside it as you place the job at the far end of the bag adjacent to the vacuum hose. This is not my particular fetish, I don’t really enjoy climbing inside the vacuum bag and was glad on this occasion to borrow Graham Scott’s much larger transparent vacuum bag. When you are using a vacuum bag you have to have a flat baseboard on which to veneer otherwise the bag can distort your job and it’s a good idea to cover the job with a thin sheet of hardboard or 3 mm MDF that extends over your job by no more than 5 mm. This stops the bag pulling the veneers over the edge and damaging your job.
 That job done, and yes so far it looks like we do have a sun burst that meets at a pinpoint all that remains for me now is to veneer the leaves of the table, put in the cross-banding and an in-lay. That I’ll talk about next month.
Finally, an ebony line was routed in to the edge of the table. I mentioned at the start that lines and inlays are often used to provide ‘wear’ strips. For instance on the corners of objects where two veneers often meet and are vulnerable to damage. I was using an ebony line in this case to provide a visual rim to the table and also a hardwearing edging as otherwise my veneers would have been vulnerable. I routed a recess using a rebate router bit and running on against the edge of my table with a bearing. The ebony line was then glued in to the rebate and held in place with masking tape strapped every two or three inches. Once the ebony line was in place I was then able to finally route away the edge of the table to the finished curved section. I couldn’t do this beforehand as my ebony line needed that part of the edge of the table to guide the router. An example of how one often has to think of what process we have to do first before we cut off the ground we are standing on.