It’s quite cosmopolitan in our workshop at the moment. We have Floris from Holland and Buz from Texas. Buz is one of the first of a new kind of student I seem to be attracting at the moment. Buz is a fully qualified designer, having spent time at Pratt University in New York and the Danish Design Skole in Copenhagen. Buz I think is quite clever, he recognised that the training he was receiving in design was not equipping him with the complimentary making skills.
This is something we see more and more in colleges. As the cost of running machine shops and technicians and bench shops becomes so high that design students are being trained in computer skills, so enabling them to create a virtual object but are not training designers in anything but theory how to create a real object. The problems occur when these virtual objects are tested against the very different and demanding requirements of real-world production.
It was with this understanding that Buz came to me to spend a year here hoping to gain a better knowledge of the craft side of furniture construction and gain some understanding of materials and hand processes as well as machine techniques.
When learning how to work timber the easiest way to understanding it is to work it with hand tools rather than machine tools.
Though Buz’s aim is not to be a bespoke furniture maker, he sees his role much more as working with industrial clients developing pre-production prototypes. His designs are then to conform to his client’s manufacturing requirements and market requirements.
What we’re giving Buz I hope is an understanding of the limitations and the potential of his materials and the first step towards doing this is pure bench skills. When learning how to work timber, the easiest way to understanding it is to work it with hand tools rather than machine tools. When you cut ash with a chisel, you understand something more about its tough resilience; you also get to feel first-hand textures and grain potential that textbooks could never teach you. But Buz also came here to work with me and see how I worked as a creative designer with the bespoke end of the furniture market. We are making one-of-a-kind furniture here that is not in any way restrained by the restrictions of manufacture. We are exploring shapes and forms that couldn’t possibly be achieved in a manufacturing situation, and thankfully our clients can value the work that we produce because it is unique and because it is different from that available from conventional manufacturers.
One of Buz’s first projects, when he came here, was a workbench. I like students to make workbenches. There’s something psychologically sound about making as well as you can this monolithic slab of wood on which you will be making everything else. It’s a good making exercise ‘cos its joinery writ large, its relatively simple and we’ve made so many benches over the years that we’ve managed to refine our workshop benches down to something really quite simple and straightforward but Buz being a designer, didn’t want to make our bench – oh no – he wanted to make something else. But then in Buz’s situation, I would have wanted to make something else.
When I first sat down and talked with Buz about what he was going to be making with us, he nodded and said ‘yes that’s great, but it’s too big, and it’s very heavy. I’m going to be moving around Europe for the next few years and what I need is a bench that is stable and strong and will perform all those functions that a conventional cabinetmakers bench will do, but I want to make it smaller and lighter and knockdown so that I can take it apart and put it in the back of the car or a trailer.’ So that’s what we did. Buz worked with his computer skills he used his knowledge of CAD programmes to develop a whole set of drawings that enabled him to see and view the bench from different angles. At each stage he was checking and working with Nick and myself to develop joints and constructional methods that would firstly hold this beast together and secondly be relatively easy for Buz to make.
Some people think it’s the sides or cheeks of the tenon but it’s actually the shoulders that bear on the other components and it’s the shoulders of the joint that on a dry fitted assembly have to be up tight if the joint is to stay strong.
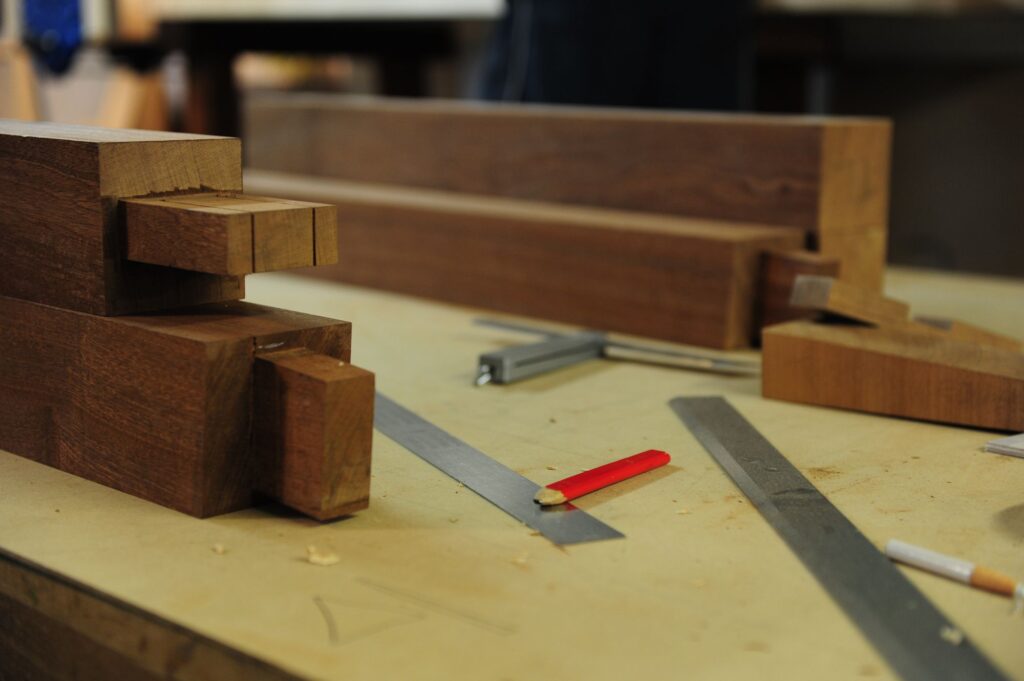
The bench we conventionally have here is a real monster. It’s about 7ft or 7ft 6inches long and is supported on more or less 4×4 legs, either biscuited or morticed and tenoned together depending on the preference of the student. This gives two frames, each containing two leg supports. These are joined together at the bottom by 2 large, heavy rails which are morticed and tenoned through the side frames then dry wedged in. The benchtop and tool well are then bolted on to the top of this rigid structure. This is pretty quick and simple to make but was much too heavy for Buz’s self-imposed design brief. What Buz came up with was a variation on the stand that Nick had used for a bench which was essentially 11/2 inch stock, butt-jointed together at one corner to form an ‘L’. Unlike our standard bench which has two frames each with two legs attached with rails, Buz kept his four legs separate, and his design challenge was how to fix rails to link these four legs together in some way that would be knocked down. Also, it needed to teach him some useful woodwork and would be strong enough and stable enough when he put his bench together. What he came up with was a variation on the mortice and tenon joints. His rails are made from the same thickness stuff as his legs 1 1/2 inch, and he whacked his mortises through his legs to allow the end of the rails to poke through but where could the shoulders go. The shoulders are the part of a mortice and tenon joint that gives the strength. Some people think it’s the sides or cheeks of the tenon, but it’s actually the shoulders that bear on the other components, and it’s the shoulders of the joint that on a dry fitted assembly have to be up tight if the joint is to stay strong. Buz worked out that if his tenon went inside the ‘L’ of his leg, he could get away with only having one shoulder on his tenon. This could be achieved by planting extra pieces on the sides of his rails and undercutting them. This undercut would correspond with the bevel that we put on the edges of the legs. Isn’t it wonderful what people can dream up when they approach a simple thing like a bench mortice and tenon joint from a technically fresh and new viewpoint?
The benchtop posed another challenge. We make our benchtops from 2 slabs of 3-inch maple with a simple MDF tool well between them. Buz took this format and reduced the thickness of the components down to 1 1/2 inches to save weight but had to joint on a front section to stop this thinner benchtop from bowing and moving around in use. While he fitted a decent 10-inch vice at one end of the bench, he put a prefabricated end-vice at the other. This end vice is the kind of thing you see on relatively small and somewhat amateur quality benches. It doesn’t have the opening capacity of a full-sized end vice neither does it take up the space of a full-sized end vice but it functions relatively well within a limited capacity which is all I think it really needs to do for Buz. Once you have a well-sorted design, it’s relatively easy to improve it and make short cuts and efficiencies. This is a situation we’ve had, having made dozens and dozens of students benches over the years. A relatively quick student can make a good bench in between 6 and 10 weeks, and that includes between 1 – 2 weeks in making a really good dovetailed end vice around a large metal screw. Buz’s bench has taken a great deal longer than this that is the cost of the designing and prototyping new ideas always do take longer especially when at the same time as doing all this design stuff you are also learning how to do the making at the same time.
One of the wizard wheezes on Buz’s new bench was the tool carrying tool well. These are usually made up of 3 pieces of MDF and can easily be taken in and out. This is to facilitate applying a cramp in the centre of the expansive bench area or (the less expansive bench area on Buz’s bench). This is great – simple, cheap and works well. When it gets filled up with sawdust, shavings, rubbish, half-eaten sandwiches and old cups of tea, you sweep it out. Now Buz has come up with a new use for the tool well – that as tool storage area. When the piece of MDF has become riddled with holes and saw cuts to accommodate different tools. “How do you know which of these three chisels is the big one and which is the small one?” I ask. “Well, I’ve got the size written on the top 3 mm, 6mm, 9mm”. “Oh”, say I. “What happens when you want to lay something flat over the whole of the surface of your bench”, say I. At this point a sly smile creeps over Buz’s face – “oh you just take the tool well out and swap it with this piece of the shelf.” At this stage, he pulls away the front part of the shelf which is fitted inside the 4 legs and slides the tool holding tool well into its new home replacing the missing tool well piece with the section of shelf removed. Talk about cunning plans and clever tricks. I sit back in open-mouthed amazement.