This month we look at the challenge of designing and making an extending circular dining table. Circular dining tables can be easy to extend if you cut them in half and put one or two straight-sided leaves into them. This gives you a ‘D’ ended table. My client, bless her heart, wanted an extending dining table but she didn’t want a ‘D’ ended table when extended. She wanted us to do it the hard way, which is to extend the dining table by adding an additional ring of leaves around the circumference of her smaller circular dining room table. I know this is difficult to make and I think would fare up there amongst the best of them. The problem with extending tables is it’s always a compromise. You are not making a 6-seater dining table or a 10-seater dining table you are making one that does both, and the challenge is to make it look as good as you possibly can in both situations.
Another challenge that the designer has is one of structure. Many circular dining room tables are pedestal tables – that is built around a central pedestal. That may function really well for a 6-seater circular tabletop, but when you put in an additional set of leaves around the outside, it gets all wobbly and unstable. If you make a central pedestal huge and massive, perfectly able to take the stresses and strains of the largest circumference tabletop, the whole thing looks out of proportion when those leaves are removed, and you are left with a small 6-seater dining table. In addition to this, my clients have two distinctly different requirements. She wanted a table that was light and delicate and standing on tippy-toe. He wanted a table that was rugged and strong and “something I can dance on ! ” Don’t you know that at some stage in this project you’re going to get caught in the bear trap. Anyway, I did various drawings and she ‘hummed and hared ‘ and changed the specification, first it was a 10 seater-table then it was a 6-seater, then a 12-seater and then an 8-seater. A problem was that my clients were moving to New York, she didn’t know where she was going to be living so although wanting a table that would dine half of Manhattan it had to fit into what could be a relatively small broom closet.
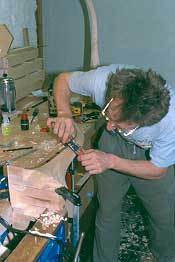
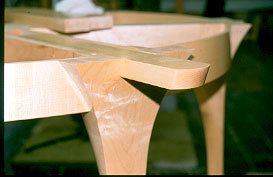
 The answer came when I remembered a table I had made many, many years ago for a client that had an aversion to barking his shins on table legs. This was a circular table but rather than 4 legs it had 6 legs and each of the 6 diners sat in between a pair of legs. This gave me the answer to my structural problem because it enabled me to put 6 relatively delicate legs around the perimeter of the 4 ft 6 in diameter table. This would give me 6 points of stability relatively close to the edge of the 6 ft 6 in diameter table, which is what this beast would be when fully extended. My lovely client wanted a table that was all light and frothy and delicate, like a ballerina up on tippy-toes. I had made a pair of very fine thin-legged tables for her London apartment, and she thought that all my tables could be that way. What we came up with after much tooing and froing was a modern version of the cabriole legs. To convince her of the final shape and slenderness of this leg, we made two full-sized prototypes of the leg to take up to show her in London. These were made in softwood but painted white to give the form some clarity. Brian Moon had the task of making the base of this extending table. The first thing he did was to cut my prototype leg in half to get a profile. Blanks were then laminated up, but the front face of the structure had to be capped with a 3 mm thick veneer of figured maple.
 All of the Maple that we get over here is relatively dull and boring. That’s because it is cut and selected in the States and all the figured and curly stuff is picked out and quite often sent for the veneer manufacturers. But some boards do slip through the net. I had to clamber over a stack of maple and try the patience of the yard man at Atkins and Cripps Timber Yard in Plymouth. He was very patient with me, and we did find a couple of boards with some figuring. These were bandsawn up, very badly by me, to give 6 decent figured veneers. To cut these, I had to borrow Keith’s bandsaw which has got a slightly higher depth of cut than mine – I told him I’d buy him a new bandsaw blade and I went over-equipped with same. The trouble when you’re working in someone else’s workshop is you’re a little disorientated and tentative. I put this bandsaw down somewhere, set the machine up and then went to fit this new blade but instead fitted not my new blade but a very similar blade that Keith had just taken off the saw. ‘This blade isn’t running very well, Keith’, I said. ‘That bloke who sold me the saw must have pulled a fast one on me, look there are even traces of resin on the side of the blade’ I grumbled on. Not knowing my shiny new blade was sat at the back of Keith’s workshop. Brian wasn’t terrifically impressed with my bandsawn veneers, especially as it meant that the mould that he’d made to press these veneers on to the legs wouldn’t function as accurately as it should have done. The answer came by sending Brian off on his bike to Bideford with veneers in his backpack to Graham’s workshop where there’s a thicknessing sander I can rent time on. In the end, we got them done – each of the legs have sequential matching figured maple facing veneer and things started to look up.
My client didn’t want anything that had any feeling of board room, which tables with leaves inevitably have as it’s the simple way of putting detail around the edge of table leaf.
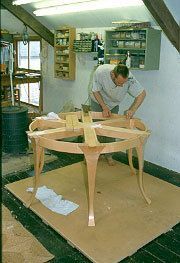
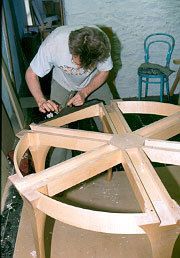 The legs are attached to rails that meet in the centre of the table. These rails form a ‘u’ shaped channel and are made quite simply from 3 pieces of Maple. Inside this ‘u’ shaped channel slides what is called a loper. The loper is the piece that sits underneath the tabletop and is pushed into the centre of the table when it is being used by 6 or fewer diners. When the table is extended these lopers are pulled out, and 6 leaves sit on these 6 lopers and push under the moulding around the edge of the 6 seater dining table. At least that’s the plan. Making the tabletop has been my project, and I must admit I haven’t got very far with it. This is a veneered tabletop created in what is called a sun-burst pattern by the veneers radiating out from a central point. The veneers that we are using will be Ripple Sycamore, detailed with ebony and a small banding of Birds Eye Maple. My client didn’t want anything that had any feeling of board room, which tables with leaves inevitably have as it’s the simple way of putting detail around the edge of table leaf. My challenge is to lay a large sunburst pattern, and there were technical challenges about that which I’ll go into next month when I’ve encountered them. All I know now is it could be a little tricky. The first stage of the work on the tabletop was to bring the MDF sheets, yes, this time I’m using MDF and staying away from plywood. I’ve got such problems with Latvian Birch plywood that I’ve decided that I’ll never let it in my workshop again and even MDF which is a far more stable product, I’m taking more care with. This stuff had come into the workshop and been shaped and put in stick well before the veneers were applied. This should be kept heated, and the air humidity kept down as low as I can. Even MDF as rated as being a relatively inert stable ground material is known to cup and move around if it’s not treated with some care. So the board and the lippings that were to go around them were stickered out and left in this relatively dry environment for as long as I could before I started veneering. To cut clippings, we were routing shapes we required a workshop made trammel bar. A trammel bar is, in this case, a length of MDF with a router mounted on one end and a hole drilled at the other. As long as you are careful to drill a hole dead vertically in the drill press and then use the shank of the same drill as a pinion, that is if you are using a 10 mm drill bit to drill the hole use the shank of that 10 mm drill bit to form the pinion inside that hole, you can get a very accurate and quickly made trammel bar this way. When I was fiddling around with the top and being distracted by numerous other things, including clients websites and magazine articles, Brian was rattling on with the table base.
 Maple is one of those great woods that takes a wonderful shine, and Brian was using transparent shellac to bring out the warmth of the timber and put a hard and durable shine on the table. As this is going to be a fine dining table rather than something a little more utilitarian, we decided that shellac was an appropriate polish. It takes weeks to build up a good polish in shellac, and that’s going to be one of the jobs I’ll have in front of me in the coming weeks. Next month I’ll talk about the sun-burst veneering of this tabletop, inlaying the marquetry centre and polishing the table in time for the next exhibition. That’s if we can get it all done.